Saturday, 5 November 2011

Studio shoot three- portrait

For my third shoot I decided to look at advertising a basketball with a model, here are my final finished four images of my shoot after my internet research.

 I really like this image as I like the way the light makes it look dramatic, also the light is mainly on the basketball exaggerating what i'm adverting.

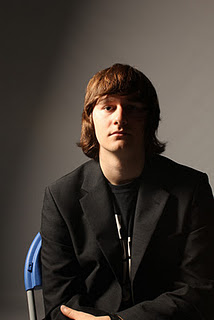
 This second image is also one of my favourites as its a typical model shot, with the model looking moody yet shy whilest holding a product their adverting, in this case a basketball.

This image is similar to one I came across on my internet research, I really like it as I feel it gets to the point in what its advertising. Also I feel like it has abit of mistery involved in the way you cant see the models face.

This is my final image and my most unusual one. I like the way its different from the others, I photographed the ball so it looked like it was floating in mid air controlled by the model (basketball player).

I have found it very hard to pick from these four images, so I've put them all on here so I can compare them. After looking through these images I've decided this is the one I will use as my advertisment campaign...

I picked this one as it is simple and gets to the point. There is nothing destrating or taking away from the basketball in the shot. If I was photographing the model as my advertisment campaign I would of probably picked one of the other three images. How ever the one I have picked now is perfect for advertising the basketball.

studio shoot two- product

For my second shoot I decided to look at advertising a basketball trophy, here is my final finished image of my shoot after my internet research.

I am very pleased with my finished out come, I took lots of photographs on my shoot and this was my favourite image. I really like this photograph as I feel my lighting is good on the trophy showing good reflection and shine on the surface. I photographed the trophy at an angle giving a more 3D affect, also the angle I photographed the trophy at makes it look like the figure on the top of the trophy is looking towards us, making the view feel more involved in the image.

Wednesday, 2 November 2011

Studio shoot one- product

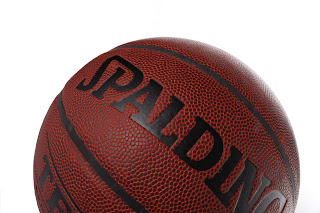
For my first shoot I decided to look at advertising a basketball, here is my final finished image of my shoot after my internet research.

I am very pleased with my finished out come, I took lots of photographs on my shoot and this was my favourite image. I really like this photograph as I feel my lighting is good on the ball showing all the bumps and groves. Also I've made sure that I got the balls make in the shot which is very important when advertising a brand. I took my photograph of the ball slightly on its side giving more of an edge to the image rather than just head on, also I focused on the brand of the ball the most, making good use of my frame.

examples of depth of field

Before I did my own shoot on depth of field, I did a little internet research to see other peoples interpretations.

 This first example is very clear and easy to do. To to this myself I will need a long object and shoot it at an angle. I will also have to set my camera lens to manual focus, to make sure I get the image I am after.

This final image is my favourite as I like the way it is two images comparing against each other. This is something I will consider in my own work as you can really see the different affects between the two.

Tuesday, 1 November 2011

Depth of field and Stutterspeed Evaluation

I was given a task to experiment the use of depth of field, at first I found this brief really hard but soon got used to it...

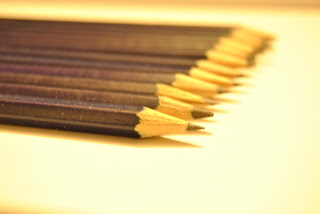
 My first image is of a group of pencils in a line, I focused my camera on the first pencil so that the ones in the distant got more blured the further they went back.
ISO - 200
Shutter speed - 1/25
Aperture - F 11.0


 For my second image, as you can see its the same line of pencils, but this time I put my focus to the back pencil, making the ones closer to the front more blured.
ISO - 200
Shutter speed - 1/25
Aperture - F 11.0


My final image is of a remote control on its own. I again put my focus to the front of the prop making the part further to the back more blured. You can see this by looking at the buttons on my image of the remote.
ISO - 200
Shutter speed - 1/25
Aperture - F 11.0

This final image is of a tram, I photographed it at an angle so you could see the distance in it.
ISO- 600
Shutter speed- 5 seconds
Aperture- F6

Tuesday, 18 October 2011

Studio lighting- advanced techniques

For this shoot we were split into groups to do lighting workshop using professional studio lighting equipment.

Rembrandt lighting - light is high and aimed at the side of the models face which is facing away from the camera.

Hollywood lighting - light is moved further around the subject so its just off centre.

Butterfly lighting - light is high and directly in front of the subject, presenting a distinct butterfly-shaped shadow under their nose.

Side lighting - where the light is pushed either to the left or right of the subject.

Rim lighting- brings out an outline of the subject and creates a silver lining effect.
Hair lighting- position the light above and slightly behind the subject and aim it towards the hair to bring out the texture and detail.

Here are some examples of our group work..

Butterfly lighting
ISO - 100
Shutter speed - 1/100
Aperture - F 11.0
Focal Length - 51.0 mm
Side lighting
 ISO - 100
Shutter speed - 1/100
Aperture - F 9.0
Focal Length - 52.0 mm

Rembrandt lighting
ISO - 100
Shutter speed - 1/100
Aperture - F 10.0
Focal Length - 53.0 mm

Rim lighting
 ISO - 100
Shutter speed - 1/100
Aperture - F 9.0
Focal Length - 53.0 mm
Hair Lighting
ISO - 100
Shutter speed - 1/100
Aperture - F 10.0
Focal Length - 52.0 mm

Research of Kipsta Jerseys

Here are a few images of Kipsta Clothing I came across on my internet research...

 This finish image is very simple, I like the way you can't see a person wearing the jersey but the creases indicate that there is a figure wearing it. This is something I would like to attempt in my wn shoot.


 This image is similar to the previous image, I would like to combined both shorts and tshirt together when doing my shoot, rather than have them separet.


 This image is the front and back of the basketball jersey's which gives more dimentions to it, this is something I would like to experiement with when doing my own shoot.


This final image isn't to do with basketball but when I came across it in my internet research it gave me some ideas for my own work. I like the way the black background exaggerates the jerseys and the way the models are on their side but facing the camera. This is something I will have to think about in my own work.