For this shoot we were split into groups to do lighting workshop using professional studio lighting equipment.
Rembrandt lighting - light is high and aimed at the side of the models face which is facing away from the camera.
Hollywood lighting - light is moved further around the subject so its just off centre.
Butterfly lighting - light is high and directly in front of the subject, presenting a distinct butterfly-shaped shadow under their nose.
Side lighting - where the light is pushed either to the left or right of the subject.
Rim lighting- brings out an outline of the subject and creates a silver lining effect.
Hair lighting- position the light above and slightly behind the subject and aim it towards the hair to bring out the texture and detail.
Here are some examples of our group work..
Butterfly lighting

ISO - 100
Shutter speed - 1/100
Aperture - F 11.0
Focal Length - 51.0 mm
Shutter speed - 1/100
Aperture - F 11.0
Focal Length - 51.0 mm
Side lighting
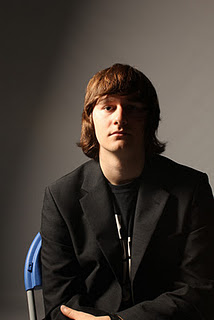
ISO - 100
Shutter speed - 1/100
Aperture - F 9.0
Focal Length - 52.0 mm
Shutter speed - 1/100
Aperture - F 9.0
Focal Length - 52.0 mm
Rembrandt lighting

ISO - 100
Shutter speed - 1/100
Aperture - F 10.0
Focal Length - 53.0 mm
Rim lighting

ISO - 100
Shutter speed - 1/100
Aperture - F 9.0
Focal Length - 53.0 mm
Shutter speed - 1/100
Aperture - F 9.0
Focal Length - 53.0 mm
Hair Lighting

ISO - 100
Shutter speed - 1/100
Aperture - F 10.0
Focal Length - 52.0 mm
Shutter speed - 1/100
Aperture - F 10.0
Focal Length - 52.0 mm


